Ginger Snickerdoodles with White Chocolate

I made these for that same New Year's Eve party, and they were a big hit, particularly with Gui, who isn't a huge fan of desserts normally. They are super soft and pillowy like you'd expect of a snickerdoodle, but then they have that ginger snap taste and big chunks of soft white chocolate. Yummmmmmm!

snickerdoodles_1.jpg

Speaking of New Year's, I'm still working on getting my resolutions together. But I'm set on doing monthly "themes" and ideally developing those into habits that I carry into the future. My January theme is "Strengthen Friendships." I have a tendency to be a bit of a recluse, and even though I text my friends, I'll go months without seeing them. Then I get in a bad mood and I wonder why! 

Ingredients

2 cups flour

1 tbsp cornstarch

2 tsp baking soda

3 tsp cinnamon, divided

1/2 tsp salt

1 tsp freshly grated ginger

3/4 cup (1.5 sticks) butter, softened

Directions


3/4 cup light brown sugar

1/2 cup granulated sugar, divided

1/4 cup maple syrup

1 large egg

2 tsp vanilla extract

3/4 cup white chocolate chips

1. Preheat oven to 350°F

2. In a medium sized bowl, whisk together dry ingredients: 2 c flour, 1 tbsp cornstarch, 2 tsp baking soda, 2 tsp cinnamon, 1/2 tsp salt, and 1 tsp ginger.

3. In a small bowl, combine 1/4 c granulated sugar and remaining 1 tsp cinnamon. 

4. In a large bowl, cream together 3/4 c butter, 3/4 c brown sugar, and leftover 1/4 cup granulated sugar. Add in the syrup, egg and vanilla extract, and mix.

5. Slowly add dry ingredients to wet ingredients, and mix until combined. Add in white chocolate chips and mix. 

6. Roll dough into 1-inch balls and coat in cinnamon sugar mixture that's in your small bowl. 

7. Bake for 7-9 minutes, until the bottoms are just brown. As soon as cookies are out of the oven, sprinkle the tops of cookies with leftover cinnamon sugar mixture.

Cranberry Orange Shortbread with Dark Orange Chocolate

I made these cookies for a New Year's Eve party. I wanted something festive and holiday feeling. I've always wanted an excuse to use edible gold dust, and this felt like the right time! These cookies give you all the buttery goodness of my traditional shortbread, with that sweet/tart orange/cranberry combo, anddddd the rich dark chocolate! They are also really fun to make! 

shortbread_1.jpg

The cookies end up looking really beautiful too! I did half the cookies with the right half dipped, and the other with the left so they would look really pretty either stacked or laying on the plate! 

Ingredients

2/3 cup sugar

2 Tbsp fresh orange zest, divided

3/4 cup room temperature butter

1/8 tsp salt

1 1/2 cups flour


1/2 cup dried cranberries, chopped

5 oz. dark chocolate

edible gold dust (optional)

1-2 tsp vegetable shortening

1. Use a food processor to combine the 2/3 c sugar and 1 Tbsp of the orange zest to create orange-sugar. 

2. In a large bowl, beat 3/4 cup butter, the orange-sugar, and salt. 

3. Gradually incorporate 1 1/2 cups flour to the wet mixture.

4. Mix in the 1/2 cup chopped dried cranberries. 

5. Form the dough into a ball and wrap in plastic wrap. Chill in refrigerator for 30 minutes. 

6 Roll out the chilled dough to 1/4 inch thick on a lightly floured surface. Use a cookie cutter to create desired shapes. 

7. Chill on a cookie sheet for 20 more minutes in the refrigerator.

8. Preheat 350°F

9. Bake cookies for 7-10 minutes, rotating pans halfway through, or until the edges are golden brown. 

10. Once the cookies have cooled, use a double boiler to melt the 5 oz. dark chocolate. Add the orange zest and the vegetable shortening to the dark chocolate and stir until smooth. 

11. Dip half the cookie into the melted chocolate, and transfer it to wax paper to set. Sprinkle on the gold dust, or any other desired topping. 

P.S. I only dipped the front of the cookie so that the chocolate wouldn't be too heavy and overpower it. 

Vegetable Quiche

I've slowly been renovating my diet over the last few months, replacing one meal at a time with something healthy, organic, unprocessed, and/or low in sugar. I also make and plan almost all meals at the beginning of the week to eliminate the emergency Hardee's trips due to unpreparedness. (that $5 big bag tho!) 

This also keeps my grocery bill to $20-$30 per week. (yes, cooking for one #foreveralone #mycatsfoodbillishigher)


This week, for example, I'll have:
Breakfast: organic cereal and unsweetened almond milk
10am snack: tea
Lunch: grilled chickens and black beans
2pm snack: Chobani flip (this is the one thing I haven't replaced yet because I love it and it's my treat)
4pm snack: hummus and carrots
Dinner: vegetable quiche (our featured recipe) 

I can't say I've noticed many changes in my body. I haven't lost weight and I mostly feel the same. But hopefully eating mindfully will help me live long, prosper, avoid the doctor, etc. and such as. 

It's also nice to have more control over my diet, and theoretically, my willpower (although that's not always the case). Even though tbh I'm trying to relinquish control in ALL other areas of my life so maybe I should just eat whatever the F I want too! 

Anyways, the quiche...the reason we are here...is really delicious, and it's only about 200 calories per slice or 1/8 of the pie. You can put in whatever vegetables you like, but the radishes look good, right?! Enjoy! 

Ingredients:

Pie crust
6 Eggs
1/4-1/2 cup unsweetened almond milk
Broccoli
Cauliflower
Radishes
Salt + pepper
Parmesan cheese (optional)
2 slices peppered bacon (optional)

Directions

1.  Preheat oven to 400 F.
2. Unroll the pre-made pie crust into your pie pan. Bake for 5-7 minutes. 
3. While the crust is baking, lightly whip your eggs with the almond milk. Generously season with salt and pepper. 
4. Chop your desired veggies and add to egg mixture. 
5. Julienne the radishes. 
6. Fill the partially baked crust with your egg mixture, and top with the sliced radishes. 
7. Bake for 30-40 minutes. Check periodically because you may need to cover the crust edges with foil near the end. 
8. Fry up the bacon while quiche is cooking. Then, chop into small pieces. 
9. Top fully baked quiche with parmesan cheese and pieces of bacon. 

Nutella & Cookie Dough Ice Cream Bars

I made my first recipe video ever. It's definitely not perfect, but it was a fun experiment. Either way, these ice cream bars are SO good...too good honestly. Everyone loves Nutty Bars, and their heads basically explode when they have them in this ice cream bar combo. Nutty bars, nutella, cookie dough, ice cream, omg.

Ingredients

  • 1 Package Nutty Bars
  • Nutella 
  • Any flavor ice cream, softened
  • Cookie dough, room temperature

Directions

  1. Line an 8x8 inch baking dish with saran wrap. (seriously, don't skip this step)
  2. Halve the nutty bars and line them in the dish.
  3. Spread nutella all over this layer.
  4. Spread room temperature cookie dough all over the nutella.
  5. Spread softened ice cream all over the cookie dough.
  6. Top with remaining nutty bar halves.
  7. Freeze overnight. Then use the saran wrap to help you remove from dish. Cut and serve! 

Chocolate Croissants

I've been wanting to make croissants for a long time, months probably. But these things take time....and so I had to wait for a weekend that was fully open. I started these on Friday night and then on Sunday morning had a very flaky, buttery, and chocolatey breakfast in bed! It took about 20 minutes Friday night, about 4 straight hours on Saturday, and about on hour on Sunday. The back-breaking work is on the middle day. You need a lot of energy to roll these out! Luckily I was able to bribe someone into helping me for a little bit; but honestly I did most of the work. 

This was a really fun weekend project that I would definitely recommend! Although after all the rolling out, my whole body was sore for 2 days! Also note, I usually like to roll things out with a bottle of wine (or a beer can on bad days) because I don't own a rolling pin. But you definitely need a rolling pin for this one! 

Ingredients

• 1 1/4 cup warm milk
• 2 1/2 tea. instant yeast
• 3 1/4 cups all-purpose flour, plus more for rolling dough
• 1/4 cup sugar
• 2 tea. salt
• 2 1/4 sticks butter
• 1 egg
• chocolate chips (optional)

Directions

1. In a large bowl, stir together 1 cup of flour, yeast, and warm milk. Let the bowl sit for 20 minutes so the yeast can bubble. 
2. Add the remaining 2 1/4 cups of flour, sugar, and salt, and stir until combined. Place the dough on a floured surface, and knead for about 2 minutes by hand. Form into a ball, cover with plastic wrap, and refrigerate overnight.

Screen Shot 2016-01-11 at 9.27.30 PM.png

3. Once dough has rested in the refrigerator, prepare the butter. Cut cold butter length-wise, about 1/2 inch thick and lay them on parchment paper in a square about 7x7 inches.
4. Cover with another sheet of parchment paper and use a rolling pin to roll into a uniform slab. Uncover and cut edges as needed, placing scraps back onto the top. Roll again, and continue until you get the 7x7 inch square of butter. Place it back into the refrigerator while you roll out the dough.
5. Remove dough from the refrigerator and roll into a 12 x 12 square on a floured surface.

6. Place the cold butter slab in the center of the rolled out dough, at an angel as shown.
7. Pull each corner of dough over the edge of the butter.
8. Press lightly to seal the butter in the dough and expel excess air.

9. Roll out to a rectangle about 12x24 inches. I enlisted a bit of help for this part!
10. Fold 1/3 of the dough over itself.

11. Fold the bottom third of the dough up.
12. Place the dough on a baking sheet, cover with plastic, and let it rest in the refrigerator for 1 hour. Play with the cats during this hour. 
13. Remove the dough from the refrigerator. Place on a floured surface so it is perpendicular to the rolling pin. Repeat steps 9-12 two more times. 

14. Remove the dough from the fridge, and cut it in half length-wise. Wrap one half in plastic wrap and keep it in the fridge while you work with the other half. 
15. Revel in all of your hard work that is now layers and layers of butter and dough!!!
16. Roll the dough out into an 8x15 inch rectangle. Cut into even triangular shapes. 

17. Take a triangle, and very gently roll it out to about 10 inches. It's easy to squish or break the dough at this point so be delicate. If you want chocolate croissants, insert chocolate chips now at the bottom end of the triangle. 
18. Roll the triangle from the wide end up until you form a crescent shape. Bend the legs inward to form the C. Repeat with remaining triangles. 
19. Place all your croissants (12-14) on a cookie sheet (covered) and let them proof overnight in the fridge. 20. Remove the croissants 2 hours before you intend to bake to allow them to come to room temperature.  
21. Preheat oven to 400°F. Whisk the egg and paint some on each croissant. Bake for 15 minutes. Rotate, and bake for about 5 more minutes if necessary. 

Saltine Toffee

Saltine toffee is sooooo delicious. I made it over the holidays for my boyfriend's family. It's really fun to make and has a nice rustic look when it's all said and done. You don't really taste the saltine, it's basically just a vehicle for chocolate and toffee that disappears in all the deliciousness. The toffee turns out with a soft crunchy texture. It's really hard to stop eating! I made half just plain chocolate, and half with crushed up candied cashews on it. 

Ingredients:

40 saltine crackers (about one tube)
1 cup unsalted butter
1 cup packed brown sugar
1/2 teaspoon vanilla extract
2 cups semi-sweet chocolate chips
Something to sprinkle on top (I used crushed up candied cashews I'd made) 

Directions:

  1. Preheat oven to 350F.  Line a cookie sheet with aluminum foil and spray it very well with cooking spray. 
  2. Place saltine crackers in one layer on the bottom of the pan. 
  3. Combine butter and sugar in a sauce pan and bring to a boil, stirring constantly.  Once the mixture has boiled, reduce the heat and simmer, uncovered, for 3–5 minutes. The mixture will thicken slightly. Stir mixture the entire time to avoid scorching. 
  4. Remove it from the heat, wait 30 seconds, add the vanilla extract and stir.
  5. Pour this over the prepared pan with the crackers. The crackers may move a little bit; this is fine.
  6. Bake it for 5–7 minutes, or until toffee becomes bubbly.
  7. Remove the pan and let it rest for 3–5 minutes.
  8. Sprinkle on the chocolate chips and wait for 4 minutes. The chocolate will soften and melt a little bit, and you can spread it out with a spatula. 
  9. Once the chocolate is smoothed, add the candied cashews, or whatever else you have on hand that sounds delicious. 
  10. Let cool very well. Refrigerate or freeze to expedite cooling. Break or cut into pieces. 

Biscuits

I'm sitting here, compelled to write a great story about why I made these biscuits. But do I really need to explain a biscuit craving? Nah. This is an easy and delicious recipe that will not disappoint, I promise. I made them for bacon, egg, & cheese biscuits, but I think I'd even prefer them with just butter; that's how good they are. But, hey, I have to sneak some protein in my diet somewhere....preferably right between two flakey, buttery biscuit halves.

I will add that I went to an awesome music festival last weekend. This is relevant because when I needed biscuit-making-music, I chose this awesome band I saw there — Driftwood.  There's something healing about listening to something meaningful while working with your hands. 

Baking the biscuits just 1/2 inch apart on an ungreased cookie sheet. 

Baking the biscuits just 1/2 inch apart on an ungreased cookie sheet. 

These biscuits end up having a really imperfect and rustic look to them which I like. I also think this recipe would lend itself well to a Bo-berry Biscuit knock-off, so that will definitely be my next endeavor. 

♥ 2 cups all purpose flour
♥ 4 tsp baking powder
♥ 1/4 tsp baking soda
♥ 3/4 tsp salt 
♥ 2 Tbsp shortening
♥ 3 Tbsp salted or unsalted butter, (grated with cheese grater)
♥ 1 cup cold buttermilk
♥ extra buttermilk for biscuit tops

1. Preheat oven to 450 degrees F.
2. Whisk together flour, baking powder, baking soda and salt in a large mixing bowl. 
3. Using your fingers, cut shortening into flour mixture.
4. Use a fork to cut cold, grated butter into the flour mixture. Work quickly so the butter stays cold.
5. Make a well in the flour mixture and pour in the buttermilk.
6. Working from the outside in, use a spoon to bring the flour into the center, folding until the buttermilk is incorporated into the flour. (just until combined) 
7. Gather dough into a ball, and turn out onto a well floured surface.
8. Flour your hands, then lightly fold it in half in a gentle kneading motion 10 times.
9. Pat dough into a rectangle just under an inch thick.
10. Cut the dough into squares. This will make 9 large biscuits. 
11. Place biscuits onto an ungreased baking sheet, close together but not touching.
12. Brush tops with extra buttermilk and bake 15-17 minutes until golden brown on top.

Recipe adapted from The Merchant Baker

My Nutrition Lesson

Every time I get on the internet, I'm bombarded by the new diet: veganism, 30 day diet, paleo, this, that, and the other. Oh, and if you don't do these things, your brain is going to explode or you are going to get cancer. Well, with all these different opinions, it's very hard to parse the information. I've always subscribed to the whatever-I-can-afford + everything-in-moderation diet. But I do have one small problem...I eat almost exclusively bread, cheese, and sugar. In case you couldn't tell by the food I put on my blog, I'll officially admit it now. Clearly this may be an issue...but I just don't like meat or vegetables that much, and I really hate cooking. Plus it's hard to buy and cook anything perishable when you are only feeding one. 

I finally had enough last friday when I read the inside cover of "Grain Brain." Convinced I was going to die from a carb overdose, I finally made an appointment with a nutritionist. And by appointment, I mean I met her at a graduation party that night and we talked over sangria and BBQ. It was love at first site. She was very realistic and practical, and does not follow any "diet." She has an undergrad and graduate degree in nutrition and currently works prescribing cancer patients appropriate diets. You'll just have to take my word for it that she is legit. I asked her a million questions and here is what I learned:

1. If you are a relatively healthy young person (like me), everything in moderation isn't too far off...in fact, it's how she lives. 

2. But you have to eat a lot of fruits and vegetables. As many as possible. 

3. Oh, and if you are eating the skins of those fruits and vegetables (berries, apples, broccoli, etc.), buy organic. 

4. Never buy deli meat unless it is nitrate free.

5. If you drink milk, only drink organic. Oh yeah, girls out there, did you know you stop absorbing calcium into your bones between the ages of 25 and 28? 

6. Try to stay away from processed foods....sorry lean cuisine. You are somewhat delicious and very convenient, but our love affair has to end.

7. Now, what about white sugar? Isn't it the worst thing ever? Well, my very special nutrition friend says no. Our bodies process all sugar the same way (white sugar, organic sugar, honey, etc.). It all turns to glucose in our bodies, so as long as we aren't eating it in moderation, we are good. Thank God.

So the take away from all of this is that I don't actually have to change my diet that much. Really, I'm just going to add milk, as many fruits and vegetables as I can, and take away as much processed food as possible. But I won't beat myself up over the occasional indulgence. Just like she didn't when the options were BBQ and sangria or not eating at all.

Now, I'm not writing this to change anyones mind or rebuke anyone who is on a "diet" – vegan, gluten-free, whatever it may be. I'm writing this for those of you who are like me, and don't want to think or fret too much, but do want to maintain a healthy lifestyle. For those of you who get paranoid every time you see a new diet article and who are on a strict food budget. After talking to her, I felt like eating healthy is actually more common sense than anything else. 

So with all that being said, here is a cauliflower and cheese recipe. My way of sneaking more vegetables into my life. 


2 large cauliflower heads  2 Tbs. butter or margarine♥ 3 Tbs. all-purpose flour  2 cups low-fat milk  1 clove garlic, minced  2 cups cheese (I used sharp cheddar and monterey)   cayenne pepper + salt + pepper to taste  2 egg yolks

1. Bring a large pot of salted water to boil. Chop up the cauliflower heads. Add them to the boiling water for 5 minutes. Drain and reserve 1 cup of the cooking liquid. Pour cauliflower into a greased 13 x 9 inch pan.

2. Preheat the oven to 350F.

3. Melt the butter in a large pot. Whisk in the flour, stirring constantly for 1 minutes. Whisk in the milk, garlic, reserved cooking liquid, and cook/whisk for 7-10 minutes. The sauce will thicken.

4. Remove from heat and stir in the cheese, salt/pepper/cayenne, and egg yolks.

5. Pour the cheese sauce over the cauliflower and fold if necessary. 

6. Bake for 20 minutes. Top with extra cheese and continue baking for 10-20 minutes.

Recipe adapted from Yoga Journal.

Alfajores

I finally got around to doing a Peruvian inspired dessert (based on a true story of the time I went to Peru). Well, it's not so much inspired by...it's just straight Peruvian. As you well know, I eat almost exclusively desserts, and while I wasn't loving the savory Peruvian options, I devoured their sweets. So today I made alfajores...or shall we say Alfa-squirrel-es????

DSC_0047.jpg

Alfajores are dulce de leche sandwiched between two shortbread cookies, and sprinkled with powdered sugar. In my vaaaasssttt experience with alfajores, I felt that the double shortbread was just too much cookie and you were kind of missing the dulce. So I unsandwiched mine — or rather, I never sandwiched them at all. I used my very easy and very delicious go-to shortbread recipe. Seriously you can't miss with this one. They're buttery, and soft and crunchy.

DSC_0040.jpg

While the shortbread was easy, the dulce de leche was quite the new experience for me (such an emotional roller coaster). First of all did you know that it's just made from sweetened condensed milk? Dulce...sweet...leche....milk. Who knew? 

I made some more traditionally shaped alfajores as well.

I made some more traditionally shaped alfajores as well.

The construction is pretty easy here. Just slather some dulce onto your cookie and then sift some powdered sugar over the top. I was pretty generous with my dulce because, hey, what am I gonna do with it afterwards? Sit in bed pantsless and eat it? Let's not leave that as a valid option. 

DSC_0029.jpg

I love working with shortbread dough because a) it's delicious and b) it requires you to throw flour all over the counter. This always reminds me of my grandma and the cookies she used to make. She used flour so much in her everyday life that she had an entire kitchen drawer full of it. And no, I don't mean she had a drawer full of bags of flour. I mean she poured flour straight into a drawer so she would always have easy access to it. 


Easy Shortbread cookies:
2 cups all-purpose flour
2 sticks unsalted butter, softened
1/2 cup powdered sugar
1 teaspoon vanilla extract

Directions:
1Cream butter and powdered sugar using a mixer until fluffy and light in color. Mix in the vanilla.
2Reduce the speed to low and mix in the flour until just incorporated. 
3Form the dough into a nice ball cover it in plastic wrap and refrigerate for about 30 minutes.
4Preheat your oven to 350 F.
5Lightly flour your surface and roll out the dough. Use a cookie cutter to create your desired shapes.
6Bake the cookies for 10 to 14 minutes, or until the edges are lightly browned.
7Let the cookies cool completely and then "frost" with your dulce de leche. I used this really awesome recipe. All you need is 1 can of sweetened condensed milk.
8Use a sifter to sprinkle with powdered sugar. But if you don't own a sifter (like me) you can use a strainer. It's a bit messier but it gets the job done.

Thanksgiving & the Chocolate Torte

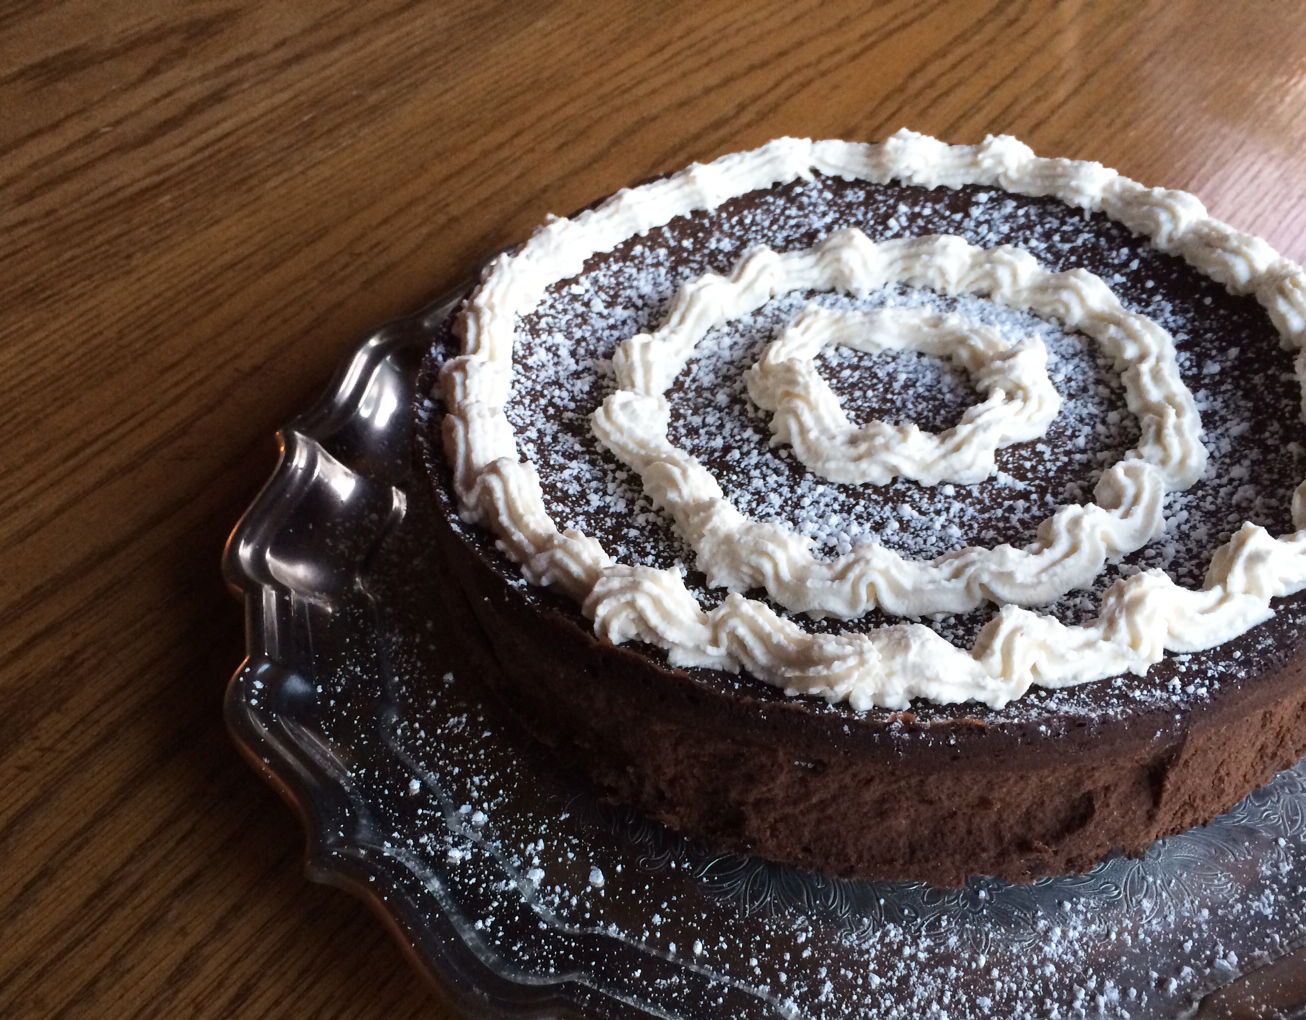
Well, I hope everyone had a fantastic Thanksgiving. I always go home for this holiday, an I'm only in charge of two things in the kitchen....the dessert and they gravy. I know, I know BIG responsibilities. But my mom never lets me help and it's definitely because I'm very messy in the kitchen and it drives her nuts. But anyways....I made this chocolate torte with Kahlua whipped cream. And no, unfortunately I can't take the credit. Both these recipes came from the lovely Chew Out Loud duo and they are really wonderful.

torte1.png

There are a few very important things I need to say about this torte. First of all, this torte is not for the faint of heart. It's intensely chocolately. The nice thing about this is that a smaller piece is satisfying, because it's just so dang sweet. Another thing to note is that this cake is flourless (which also makes it gluten free). But the point is this cake is wonderfully dense (and yet somehow still light), and is more of a fudge consistency than anything else. You know when you make a cheesecake and the inner circle is nice and dense and cheesy and then you get to the outer edge (AKA the last bite!), and it's all filmy and yuck? I had expected this cake to have that problem. But it's truly dense and fudgey until the last bite!

torte2.png

See that fudgey edge? Ohhhh yeeeaaaah. Also the Kahlua whip cream was a great touch, and I had a lot of fun piping it on there. I don't get to pipe very often and I'm usually terrible at it, but I was pretty happy with this particular performance. 

toret3.png

I was very lucky this Thanksgiving to see some dear old friends...the girls to whom I give full credit for getting me through high school. We took the above picture in 2006 (all of us were 17 or 18) before we went to college. We took the bottom one last night. So fun to see how far all of us have come. And I'm not just talking about our stunning good looks...

2006-2013.png

As for today we mostly relaxed at home. Playing pool, being weird, and maybe or maybe not sneaking out at 6pm to check out the swarms of people buying TVs. 

vscocam_1385660208.642018.IMG_0241.JPG

Ingredients

  • ½ cup prepared strong coffee
  • ¾ cup granulated sugar
  • 18 oz bittersweet chocolate (I used ghiradelli) 
  • 1 cup softened salted butter, cut into pieces
  • 6 eggs
  • pot of boiling water

Directions

  1. Preheat oven to 300F. Set your water to boil but keep it on medium so it takes a while. This will give you plenty of time to prepare your mixture.
  2. Line a springform pan with parchment paper. Grease the parchment and sides of your pan. Sprinkle with cocoa powder. Wrap the edges of pan with thick foil.
  3. Combine the prepared coffee and sugar. Stir over medium heat until sugar is comletely dissolved. Set aside.
  4. In a double boiler, stir the bittersweet chocolate chunks until melted. 
  5. Transfer melted chocolate into a large mixing bowl. Slowly beat the butter into the chocolate, 1 piece at a time. Gently beat in the hot coffee/sugar mixture.
  6. Beat in the eggs, one at a time, just until combined. 
  7. Pour batter into prepared springform pan. Place the springform pan into a large baking dish and pour your boiling water into it ensuring you don't accidentally pour water all over the torte. 
  8. Bake for 45 minutes. The center should be wettish and a bit jiggly, with edges and top looking done. 
  9. Let cake cool to room temp in springform pan, and then cover/chill overnight in fridge. Keep chilled until ready to serve. 

Whipped Cream Ingredients

  • 4 tsp water
  • 1 tsp plain gelatin
  • 1 cup heavy whipping cream
  • 1 tsp vanilla extract
  • 2 TB powdered sugar
  • 1 T Kahlua 

Directions

  1. In large mixing bowl, stir the heavy whipping cream, vanilla extract, powdered sugar, and Kahlua. Put this bowl in fridge to keep cold.
  2. Mix gelatin with water in a microwave safe bowl.  Let sit for about 10 min.  Microwave for about 20 seconds. 
  3. Take out the bowl with whipped cream ingredients.  Beat on medium until ribbons form.  Stop beating and ensure that your gelatin mixture is still liquid and almost cool. Resume beating whipped cream mixture, while slowly pouring in liquid gelatin into the mixture. Beat to stiff peaks. Keep in fridge until ready to use.

Kahlua Whipped Cream source | Chocolate Torte source